How to Pressure Wash a Driveway - A Complete Guide on Cleaning and Maintaining a Spotless Front Face on Your House
It would surprise you to find how many changes you could bring to your house, just by a simple cleaning job on the driveway or pavement. That said, pressure wash driveway can freshen up its look and make the entire house a lot more inviting and welcoming.
Therefore, for those of you who need instructions, our complete guide on pressure washing driveways and pavements will provide everything you need to know.
Start with the general knowledge, you can then learn the exact steps to power wash concrete driveways through our complete guides. Find out more about this as we dive deeper into the article below.

A dirty driveway can make your house look a lot less attractive
About pressure washing concrete and brick
To start with, you should know a thing or two about your driveway cleaning machine and its uses. This would allow you to select the right products and make good use of them, depending on your specific cleaning tasks.
➜ RELATED: Ryobi 1600 Psi Pressure Washer: Compact but Powerful Pressure Washer for Residential Use
Electric and gas-powered
To power your pressure washers, there are two common ways, which are to use gas-powered engines or electric motors. The two both boast certain sets of advantages and disadvantages, which make them somewhat different from each other.
However, as long as cleaning concrete and brick driveways is concerned, you can choose products from either of these categories and still feel completely satisfied – just pay attention to their major differences.
Beginning with gas-powered products, you’ll often have better maneuverability and portability since the engine doesn’t need a power outlet to run. On top of that, gas engines would often deliver more power compared to that of an electric pressure washer. Hence, you will have better cleaning power if you’re planning to work on some demanding tasks.
But still, that doesn’t mean that your electric machines can’t get any stronger. In fact, with the best electric pressure washer, you can totally have access to extreme water of pressure of 4000 PSI or more. This would be enough to blow off paint and any other stubborn stains on the targeted surfaces.
And by having electric motors, the product is a lot more convenient for household use, as you can easily connect it to a certain power outlet and start cleaning whenever you want. Not to mention that the limited spaces around your houses, will not require the power cord to be extended.

Gas-powered pressure washer offers better power
Hot and cold pressure washer
Most users are only familiar with the regular cold pressure washer, which uses water directly from the garden hoses. However, there is also the hot pressure washer which comes with its own heating tank to boil water.
The high-temperature water would help to quickly break down grease and oil, at the same time, eliminate germs and bacteria on the surfaces. Hence, it’s considered a more thorough cleaning method and is often featured on commercial cleaning products.
On the other hand, for regular house cleaning, you can still trust your regular cold pressure washer as it can easily blast away every piece of dirt and stain with the right cleaning method. Not to mention that it’s also easier to use and safer since you won’t have to deal with hot water.
Different nozzles and attachments
And to get better at power washing driveway and other parts of the house, you should know more about the nozzles and other attachments.
To start with, your pressure washer features an easy-switching nozzle that allows users to change the output with a simple turn. There are usually three different settings for your nozzles, which come in various degrees, with the “zero” setting providing the strongest spray and the soap nozzle that delivers the widest spray.
Depend on your product, the number of nozzles can be varied, but the functions would remain the same. Thus, the narrower nozzles will be best for spot cleaning areas with stubborn stains. And the wider one would be great for cleaning large surfaces.
For the attachments, as long as cleaning the concrete driveway is concerned, you only need your surface cleaner. The useful attachment offers circular spraying movements and spinning brushes which can thoroughly clean up your floors.

Different nozzles will come with different pressure powers
Cleaning products
You can find different types of chemical for driveway cleaning, for various purposes. However, sometimes, you don’t even need to use any product to clean your driveway.
In fact, if you clean your concrete regularly, say, about once a year, then there is no need to use any concrete cleaner. Only a powerful spray of high-pressure water can help you eliminate most dust and dirt that may be stuck inside the concrete.
But still, for stubborn stains on your driveways and pavements, you might need help from certain chemical products. For grease and oil stains, the best solution would be to apply to degreasing products and then scrub off the stains. For paints and chewing gum, paint strippers and solvent can work surprisingly effectively. And for dirty areas with mildew and mold, you might need to apply some pressure wash driveway bleach on them.
Last but not least, always remember to finish the cleaning by having your driveway properly coated with certain concrete sealer products. This would prevent your concrete from getting stained anytime soon. And the coated surfaces will prevent dirt from getting inside, making the cleaning a lot less challenging.
➜ RELATED: How To Use A Pressure Washer To Clean Your Home
How to pressure wash driveway?
With all the mentioned information, you should now be well-aware of your driveway cleaning machine and how to use it. And we will also explain to you how to pressure wash concrete driveways and pavements with our step-by-step guide.

Learn how to pressure wash your driveway
Take the guide into consideration, you can come up with the best cleaning plan for your driveway. Remember, it would take up to a couple of days for you to complete the process, depending on the size of your driveway. So, you might want to consider your time and perform each step with care.
Step 1: Clear the concrete and its surrounding areas
To pressure wash driveway, you should start by having the pavement and driveway swept thoroughly. This would get rid of all the large debris, dirt, and junk that are covering the surfaces. This makes it easier to perform the next steps. And if you have a leaf blower, it would make things even more comfortable.
You don’t want to have your high-pressure water spray running into any sharp debris on the ground, as this could send the pieces flying around, causing damage to the machine, surrounding objects, and even to you.
And if it’s possible, you could also clean up the surrounding areas on the sides of your driveway and the pavements. Also remove objects and items that are placed on your driveway, such as plants, garbage bin, bikes, and so on. This would allow you to work more consistently and avoid obstacles along the way.
Last but not least, make sure you put tarps over your plants and over the grass to avoid soap or any cleaning product from getting on them. Once that’s done, then you’re ready for the next step.

Clear the driveway before proceed to clean
Step 2: Pre-treat the area with certain cleaning products
The best way to pressure wash driveway is to have all the stubborn stains pre-treated before you use your pressure washer. That said, you’ll need different types of chemicals for certain spots and areas.
Start with the degreaser to clean up oil drips and greasy stains on your concrete. Give the spot a few sprays of degreaser and wait for at least a few minutes for the effect to kick in. Then use a hard bristle brush to scrub the area to thoroughly get rid of the stain. Rinse off the excess dirt on the particular spot with water before it dries up.
And for the annoying gum and paint that were stuck on your concrete, applying a few drops of paint stripper or solvent cleaner can help break down their structures relatively easily. This would make much easier for later cleaning with your pressure washer. Do this a few minutes before you begin to pretreat the spots and make it easier to finish your driveway maintenance job.

Pretreat the greases and oils first
Step 3: Start the engine and begin the cleaning
With the stubborn spots being pre-treated with the right products, you can now focus on cleaning the entire driveway. And to thoroughly clean your driveway, we’ll be using concrete cleaner to get rid of mildew, dirt, and mold.
Start by connecting the machine to your garden hose, or any water source near you, then start the pressure washer. If you’re using an electric washer, just press the power button. But if it’s a gas-powered machine, you’ll need to pull the starter cord.
Remember that it may take a few tries, so do it multiple times until you hear the noise of the engine kicking in. And if your machine doesn’t fire up, you might need to release pressure in the hose by pulling the trigger a few times. Try again and your engine should start running right away.
Choose the widest nozzle setting and soak the entire driveway with water, leave it for a few minutes. Each machine comes with a siphon, which is used for transporting the cleaner solution into the water hose. You would want to drip it directly into your concrete cleaner bottle, then run the hose over the concrete surfaces.
The pressure will draw up the cleaner solution and mix it with water. Apply the soap all over the driveway if you only have a small one, or divide it into sections if you have a large driveway. You don’t want the soap to dry up before you can perform the cleaning. Plus, it may even cause streaking and smudges on your concrete, which is quite annoying.
Once the cleaner solution is in, you can remove the siphon from the cleaner solution. Place the siphon into a bottle of water and press the handle to release any excess soap inside. With that being done, you should proceed to clean concrete driveway right away.
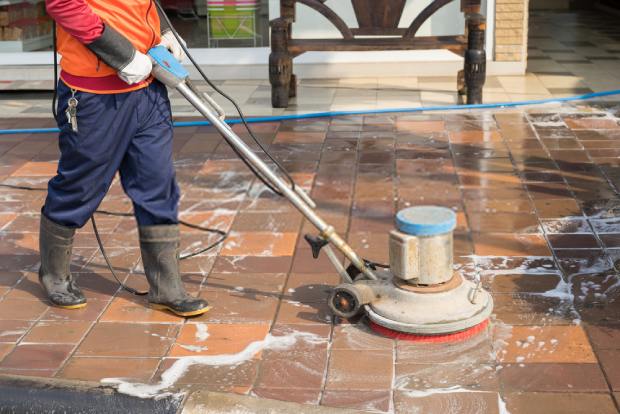
Apply concrete cleaner on the floor and proceed to clean immediately
Step 4: Use the surface cleaner to brush up the concrete
For pressure washing your concrete, some might only use the standard nozzle for the job. However, it’s suggested that you install a surface cleaner into the hose to make things less challenging. And this is because the attachment comes with a “Y” valve that separates the water into two hoses, which are positioned so that the water also spins the brush once it’s on.
Now, the high-pressure water and spinning brush on the surface cleaner can easily help you do the job. Plus, since the water is extremely strong, you won’t feel any weight from the cleaner head at all. It’ll be like hovering your cleaner over the surfaces, so you just need to take care of the control.
Start the cleaning from the highest point on your driveway and work your way down to the lowest area so that the brushed dirt and debris can run down. You wouldn’t want to work the other way around as dirt from the higher ground can easily stain the lower parts of your driveway, making it very difficult to thoroughly clean your concrete.
Move the surface cleaner horizontally across your driveway from top to bottom. Do it slowly and try not to push the cleaner head to the ground, even if you find it to be a little light on the concrete. Follow a consistent pattern and keep your pace as you work the surface cleaner over the concrete driveway.
And once you finish working on the driveway, it’s a good idea to move on to cleaning your pavement and curb, since it would be odd to have a clean driveway, yet dirty sidewalk and curb. Your house would look inconsistent, and somehow end up messier than before.
Go over the entire sections a few times if you’re not satisfied with your work, and try to set the pressure level to a higher pressure to achieve better cleaning power.
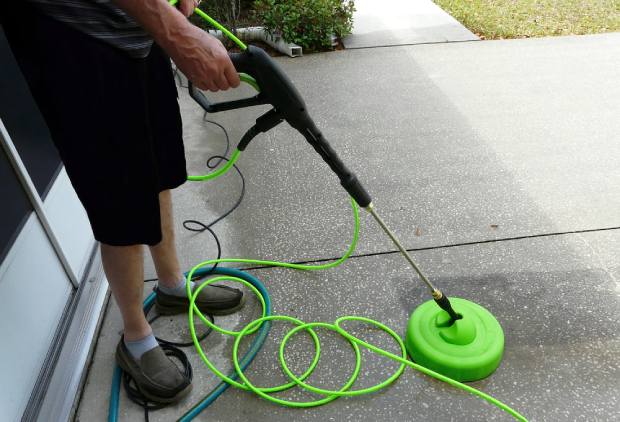
Hover the surface cleaner across the driveway
Step 5: Use the nozzles to perform spot cleaning
And with the work on the surface cleaner being finished, you can find your driveway and pavement a lot cleaner than before, even when they’re still wet. However, there are still certain areas that may require you to work extra hard to drive out stubborn stains and dirt.
In this respect, if you’ve properly done the pre-cleaning on your concrete, you would find this step quite easy since all you need is high-pressure water. Simply dismount the surface cleaner, then turn the nozzle to the narrower settings. And if it’s possible, you can adjust the output power to a higher pressure level.
Run the high-pressure water over the concrete surface, and focus on unclean spots by turning the nozzle to the narrowest setting. This will help you to blow away every bit of dirt, grime, and mold within seconds.
Work your nozzle along the crevices and cracks on the concrete to effectively blow away the remaining dirt. Place the nozzle closer to the spot to increase spraying power and away from it to reduce the pressure if you don’t want to discolor the entire area. Also, it’s also possible to add a few extra drops of cleaning solution on certain spots to make sure that they’re completely cleaned.
After you finish the spot cleaning job, change then nozzle to the medium setting and start splashing water onto the driveway, from top to the bottom. This would rinse away any remaining dirt and grime on your concrete. Do it multiple times to ensure the best result. Then let the driveway stay under the sun for the entire day so it can dry completely.

Use powered sprays to blast off dirt in crevices
Step 6: Seal the concrete with suitable sealant products
With the driveway properly cleaned and completely dried, you can proceed to add certain sealant products on its surfaces. This would prevent dirt from getting on your driveway and also allow for easier cleaning in the future.
That being said, once the cleaning and drying process is finished, you can begin to apply your concrete sealant into the driveway. Mix the solution according to the instructions and use a small spray bottle to thoroughly apply it to the concrete. Make sure that you have all the driveway covered, then let it dry in the sun for a couple of hours.
Reseal the concrete with another layer of sealant, this time, use a paintbrush to evenly spread the solution and smoothly coat its surfaces. This would protect your concrete driveway from water, salt spray, ice removal solution, acidic rain, and so on. Hence, you won’t have to clean your driveway very often while still having a nice and clean path.
Once you finish the cleaning, there is no need to pressure wash driveway in the near future as the coating would do a great job of keeping the concrete clean. And whenever it gets dirty, you just need to apply light-pressure water from your machine to easily flush away the dirt from the concrete surfaces. Remember to avoid using high-pressure water as you can easily damage the coating, which would make the concrete more susceptible to mold and stains.

Apply sealant to your concretes for better longevity
There may be many of you who ask the question: “How long does it take to pressure wash a driveway?” We hope the guide above can answer some of your most important questions. However, the process of cleaning and sealing your drive could take up to a couple of days due to the different steps and amount of work that has to be done.
Hence, before you begin your cleaning, make sure you read our instructions carefully and come up with the most suitable plans for your specific driveway designs. Give it enough time for the chemicals to take effect, as well as for the concrete to dry before moving to the sealing step. And most importantly, try to perform each step with precision and care, so you won’t run into any problem later on.
Tips for beginners
Along with the essential instructions, it’s also essential for users to note down a few important tips from our expert cleaners. If you follow these useful pressure washing driveway tips, you can work safely and effectively with your pressure washer.
1. The right pressure level for your machine
While this still remains quite controversial, from our experience, the right pressure level for your machine should only vary between 3000 PSI to 3800 PSI. At this power, your pressure washer can easily deal with most household cleaning jobs and on a variety of different surfaces.
That said, if you’re planning to purchase a new pressure washer, it’s best to go for products that can offer this level of pressure power. You can save a lot of money instead of paying for cleaning services.
2. Remember to wear protective clothes and accessories
By using the pressure washer, you’ll be dealing with extremely high-pressure water current which could range from 3000 PSI to 4000 PSI. This means that the strong blast can easily lacerate your skin, create bruises, and could be extremely dangerous if it hit your eyes.
Therefore, it is suggested that users put on certain protective gear before performing their cleaning tasks. Start with safety goggles, work gloves, work shoes, thick pants, and earplugs if you’re sensitive to loud noises, especially those of gas-powered motors.
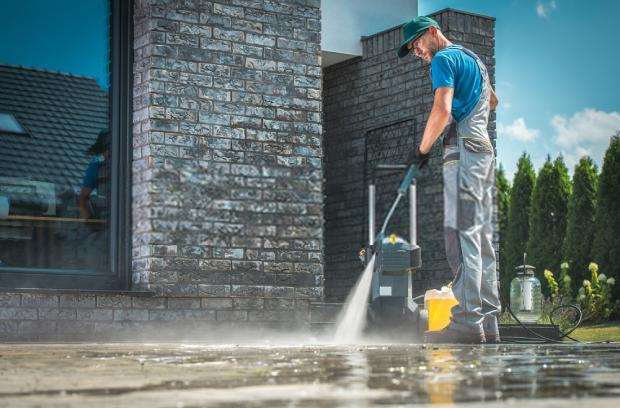
Wear the right clothes and accessories for better protection
3. Read the manual and be careful with the powerful nozzles
Before you pressure wash driveways, it’s important that you read the instruction manual and have a good understanding of the product’s features. This would allow you to operate the machine properly and avoid unwanted accidents.
On top of that, since the nozzles can be quite powerful, you should always remember to keep your hands clear from the nozzle head. Don’t let children use them and never spray the water toward others. If it’s possible, you would want to place the “zero” nozzle away since it offers the most powerful blast.
4. Use the extender instead of ladders
And if you ever need to clean areas that are above your reach, it’s best to use an extendable wand instead of climbing on ladders. The reason for this is, the generated pressure blast can easily push your body backward if you’re not careful. This, can make you lose balance while standing on a ladder, which is extremely dangerous. Hence, our experts suggest that you should invest in an extendable attachment.
5. Avoid extension cords for electric pressure washer
Sometimes, with the pre-designed length of the power cord, your electric machine won’t be able to reach a certain spot. Thus, we tend to use extension cords to connect the pressure washer. This, however, can be quite dangerous if your cord isn’t well-isolated from the ground. That said, water can easily get inside the connection and could cause electric shocks to users. Not to mention that having a longer cord with more resistance will surely decrease the pressure power on your machine.
6. Place the machine under shades and in clear space
Another thing, as your machine runs, it tends to heat up. The temperature can get quite high, especially during sunny days. Therefore, you wouldn’t want to force the device to work too hard, and always remember to place it in the shade and in a clear area.
This would allow for better ventilation and reduce the overall temperature on your machine. Plus, the open atmosphere will also prevent harmful gases, such as carbon dioxide and carbon monoxide on your gas-powered machine, to pollute the air.
7. Have a consistent schedule for pressure washing
To maintain a good-looking house, it’s important to have it cleaned up frequently, not only the concrete driveway, but also the other parts of the house, such as fences, brick patios, and more. By performing regular maintenance, you can make sure that all the surfaces stay clean from dirt and stains while remaining extremely easy to clean in the future.
That said, for your regular concrete driveway, it’s suggested that you perform deep pressure washing once a year. The wooden fences can use some cleaning twice a year. And the stone or brick structures would require a proper clean once every two years. Do these in a consistent manner and you can find the cleaning jobs getting easier and easier.

Pressure wash different areas with fixed schedules
Useful attachments that you should own
Aside from the surface cleaner, which is extremely helpful when cleaning your driveway or pavement, there are also many useful tools for homeowners.
You can start by equipping your machine with an extendable wand. This would be a great help when cleaning walls and ceilings. Plus, it’ll also make the cleaning job a lot more comfortable and easier.
In addition, the pressure washing broom, which features multiple washing nozzles, can easily sweep away dirt and debris once you’ve finished the cleaning. And for the roof gutter, having a gutter cleaner attachment would make a world of difference. Instead of getting on the roof, you can just stay on the ground to perform the cleaning.
➜ RELATED: How to Pressure Wash a House: Detailed Instructions to Bring Back Its Clean Look
Conclusion
The pressure washer is undoubtedly a great piece of equipment for household cleaning jobs, especially for cleaning concrete. And for that reason, in this post, you’ll find yourself a complete set of guidelines and instructions on how to pressure wash driveways. We hope you find our post informative and useful.
Thanks for reading and we’ll see you in our future posts.


