How to Clean Roomba: The Best and Easiest Ways
If you have a Roomba in your home right now, it’s important that you know how to clean Roomba. Like any machine, it needs regular maintenance to stay in top shape. Our guide today will show you how to clean Roomba quickly and efficiently.
Depending on the model, there can be a maximum of 11 different components that you have to clean. Here is a short list of them all:
- The dust cup
- Brushes
- Charging contacts
- Cliff sensors
- Extractors
- Air filters
- Floor tracking sensors
- Front caster wheel
- Full dust cup sensors
- Side brush
- iAdapt™Localization Camera
As you can see, compared to a traditional vacuum cleaner, a Roomba has far more components that require cleaning.
Most of the extra components are navigation sensors. They help the robot safely navigate through the house (and by that, I mean without becoming stuck, running into walls, or falling off cliffs).
The thought of having to clean “sensors” can be intimidating for a few, especially if you’re not tech-savvy. Here’s the good news: they aren’t at all difficult to clean. You don’t have to crack open the robot and check out the electronics guts within. Cleaning most of the sensors is as simple as locating them and wiping them with a cloth.
iRobot has done a very good job at designing the robot so that it is easy to clean. So, if you were anxious about this issue before, you can be more relaxed now.
➜ RELATED: Irobot Roomba E5: Is This The Best Entry-Level Robot?
How Often Do I Have to Clean the Robot?
This will depend on the frequency of use as well as the individual component.
For the dust bin, it’s highly recommended that you take it out and clean it after every use. If you don’t, clogs can form inside of the robot. Additionally, an overfull dust cup can negatively impact cleaning performance and impact the Roomba battery life.
Components that regularly make direct contact with dirt and debris should be cleaned at least once or twice a week.
This class of components includes:
- Brushes
- Extractors
- Front caster wheel
- Full bin sensors
- Air filters
Cleaning once a week is the absolute minimum. If your robot has to clean up a lot of pet hair or debris, it’s best that you take the time to clean it twice a week.
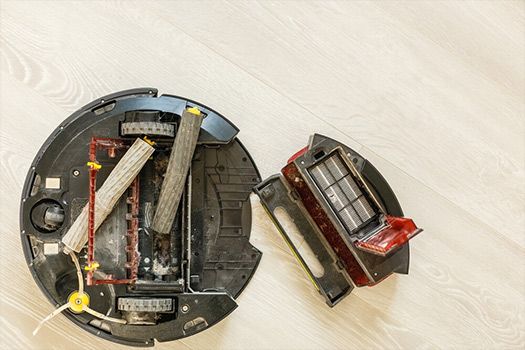
Never let your robot become dirty
Navigation sensors like the localization camera, cliff sensors, and floor tracking sensor are less maintenance-intensive. Giving them a wipe once every month will suffice.
How to Clean iRobot Roomba: Step-by-Step Instructions
What You Will Need to Follow This Tutorial
Here’s a short list of tools that you will need.
- A microfiber cloth
- Melamine foam (Magic Eraser)
- A handheld vacuum
- A standard Phillips screwdriver (or a coin)
- A pair of scissors
- A razor blade
The microfiber cloth is for general cleaning (wiping off the brushes and so on). Its softness will ensure that none of the components are damaged.
The melamine foam is a recommended tool for cleaning sensitive sensors.
As for the screwdriver, you will need it to disassemble the Roomba’s side brush. Alternatively, you can also use a small coin for this task.
A good handheld vacuum is especially important for cleaning the filters. Since Roomba’s air filters are not washable, a handheld vacuum is the go-to method for cleaning them up.
Meanwhile, the scissors and razor blade are needed to cut away any tangled hair on the brushes. You will have an easier time extracting them as a result.
How to Empty Roomba’s Dust Cup
Once again, you should clean the Roomba’s dust cup after every cleaning session. It will only take a few minutes and require very little effort.
The first step is to remove the cup.
In older models, the dust cup will be attached to a receptacle at the back end of the unit. You can remove it by pressing the cup release tab, then pulling the cup outward.
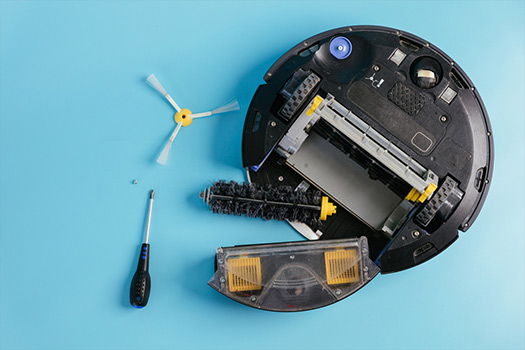
Newer Roombas will have center-mounted dust cups. In order to remove the cup in these models, there is usually a removable cover at the top of the unit. Take it off and you can simply pick up the cup using its handle to lift it out of the robot.
Empty the contents of the cup into your trash can.
If you have premium models like the Roomba S9 Plus and the Roomba i7 Plus, they will come with a CleanBase dock. This handy dock automatically sucks out all of the dirty stuff in the dust cup and deposits them into a disposable trash bag.
For these models, you don’t even have to remove the cup at all. Just pick up the bag from the dock and throw it into the trash can.
➜ RELATED: How To Empty Roomba - A Step-By-Step Guide To Clean Your Irobot Vacuum The Right Way
How to Clean Roomba Filters
The air filters are one of the dirtiest places inside your Roomba.

Roomba Filters Via: Amazon
Heavy dirt and debris particles can be easily trapped inside of the dust cup, but smaller and lighter particles like fine dust, dust mites, and bacteria are a different story.
That’s where your air filters come in. They are designed to trap these tiny micro-particles and prevent them from escaping into the open air.
If they are neglected, dirt and debris will build up on the surfaces of the filters, blocking airflow. This doesn’t just reduce the cleaning power of the robot, it will also put your family at risk, too. Some dirty particles could slip through and be circulated back into the room.
Cleaning Roomba filters is a very simple procedure. However, it’s going to be different from model to model.
How to Clean Roomba 600-series Filters
Because the door to the filter department is inside of the dust cup, you must empty the cup first and foremost.
Once you have opened the filter compartment, you will find two filters inside. Each of them will have a yellow tab. Push down on the filter tabs and the air filters are going to come out.
Gently shake the filters over a trash can. Any dirt and debris accumulated will come right out.
Do not wash the filters. They are not rated for washing.
The filters must be replaced every 2 months.
How to Clean Roomba 980 Filters (800-900 series)
After the cup is cleared, find the filter door release tab. If you don’t know where it is, refer to the user manual of your model. Once the door is released, the dirty filter will be exposed.
Lift and remove it from the unit by tugging on the yellow ribbon attached to the bottom of the filter.
Hold the filter above the trash can and gently shake it. Dirt and debris will fall off the filter. Next, use your handheld vacuum to suck up anything that’s left behind.
Once again, do not wash the filters. They are not washable.
Replace the filters every 2 months.
How to Clean the Brushes of an iRobot Roomba
There are two types of brushes on an iRobot Roomba: the primary brush and the side brush.
The primary brush is the large, rolling brush that sits at the center of the robot’s bottom. Its job is to scrub out stubborn stains and dirt as well as pick up debris lodged in carpets.

Meanwhile, the side brush is the circular spinning brush off to the side of the robot. Besides cleaning your walls’ baseboards, it can reach into the tight corners of the house and draw out dirt and debris from there.
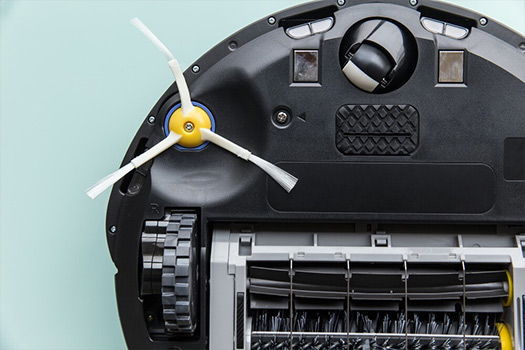
How to Clean the Roomba Primary Brush
Flip the robot upside-down. Look for two yellow tabs near the “mouth” of the vacuum. By pulling on the tabs, you will be able to remove the brush guard.
After that, all you have to do is to tug on the brushes and they will slide out.
Carefully clean the bristles of the brush with your microfiber cloth. If pet hair is stuck on the brush, you can use your scissors or a razor blade to cut through the hair clumps.
Aside from cleaning the bristles, you should also take the time to clean the yellow brush caps and metal brush cap shafts. Dirt and debris can build up there after a period of usage.
Reverse the whole process for reinstallation. The brushes must be replaced every 6 to 12 months, depending on the frequency of usage.
How to Clean the Roomba 800-900 series Debris Extractors
On the newer 800-900 series Roombas, the primary brush’s name is changed to “debris extractors.” They are more powerful and have a better design, allowing them to pick up more debris.
Fortunately, cleaning these extractors is still simple.
Find the extractor protection frame’s lifting tabs and pull upward. It should come up without any fuss. At this stage, if you see any obstruction or visible debris, pick them off.
Remove the extractors from the robot (there should be two). Give them both a few light tugs on one side and they should pop right out.
Clean up the extractors with your microfiber cloth. As always, if you have to deal with pet hair, you can use your scissors or razor blade to make the job easier.
Prior to reinstalling the extractors, you have to make sure that they are properly aligned. Each peg of the extractor has a different color and shape. Match them with the color and icons on the robot.
The extractors must be replaced every 6 to 12 months.
How to Clean My Roomba’s Side Brush
As for the side brush, watch the cap in the middle of the brush. You should see a rectangular slot running down the center. You can slot a coin in and loosen it up. If you don’t have a coin, you can use a standard Phillips screwdriver for the job.
When the side brush is off, clean it using your microfiber cloth.
Reverse the process for reinstallation.
How to Clean a Roomba’s Front Caster Wheel
Ideally, you should clean your robot’s front caster wheel once every 2 weeks. If you don’t maintain it properly, the wheel can refuse to spin, begin to squeak, or even fall out.

Roomba’s Front Caster Wheel Via: Amazon
To remove the wheel, all you have to do is to grab onto it and pull. It should pop out easily.
Give the wheel a test spin. If it doesn’t spin smoothly, check for any debris that’s lodged within the wheel cavity. Remove hair and debris if you can.
If it’s too difficult, you can pop the wheel off by pressing it firmly. Remove the axle from the wheel.
Clean off any dirt, debris, and hair that’s stuck on the axle. While you’re at it, give the wheel a wipe, too.
Reinstall the axle. It should make an audible snap once it’s in place. After that, place the wheel back into its housing.
Put the entire wheel module back onto the robot.
iRobot recommends replacing the wheel every 12 months.
How to Clean the Roomba’s Sensors
The most difficult part of the whole process is to simply find where the sensors are. Refer to your user manual for this. All models will have two sensors: cliff sensors and floor tracking sensors. A select few robots will come with an iAdapt™ localization camera.
Once you have found the sensors, use slightly dampened melamine foam (a Magic Eraser) to clean up the lenses. Only stop once the lenses are spotless and shiny.
How to Reset Roomba
After several cleaning cycles, you will notice the cleaning power of your robot drop. That’s a sign of your battery being exhausted. You can fix this issue by restoring the battery with a manual reset.
Press and hold the CLEAN button on the Roomba to power it on.
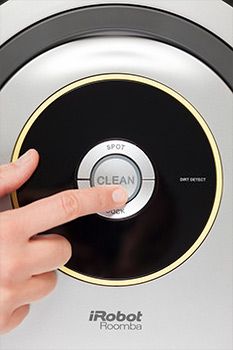
When the light starts flashing, while holding the CLEAN button, press down on the other two buttons (DOCK and SPOT). Hold all three buttons for 10 seconds.
The Roomba’s light will go off. Once this happens, immediately release the buttons. Your robot may begin to beep. This is completely normal.
Bring your robot back to its charger and dock it. Wait for a while until the CLEAN button turns green again. This is an indication that the reset process has finished and you can use your robot again as normal.
Conclusion
That’s how to clean a Roomba robot vacuum cleaner! While the entire thing may sound laborious, it’s not. You can actually do everything explained above in less than an hour once you’re familiar with the process!


