Why is My Vacuum Smoking? Understanding the Causes and Fixes
So why is my vacuum smoking? Just like us, our hardworking appliances have their off days too. There are many possible causes, and each of them requires a different solution.
The good news is that you're not alone. If you're wondering, "Why is my vacuum smoking?" be aware that this is a common problem, and there's plenty you can do to fix it. This guide will take you through the causes and how you can put your vacuum back in action.
Why is My Vacuum Smoking?
A vacuum is a complex piece of equipment with many parts working together. When it starts smoking, it's typically due to a malfunction in one of these components.
Belt
An integral part of the vacuum cleaner's functionality rests on the belt. It's what keeps the brush roller spinning and does a lot of the grunt work when it comes to picking up dirt and debris from your floors.
However, when it starts to wear out or break down, your vacuum can respond with smoke signals.
A worn-out belt strains the vacuum's motor, which can then overheat, leading to smoke. Also, if a bit of the broken belt gets stuck between moving parts, it may generate smoke due to friction.
Brush Roller

A jammed brush roller might make your vacuum emit smoke
This is another essential part of your vacuum cleaner. This spinning brush is what lifts dirt and dust from your carpet so the vacuum can pick it up. A spinning champ in its prime, but it also can fall prey to wear and tear.
Usually, it's hair, string, or debris wrapped around the roller that causes this blockage. A blocked or damaged brush roller struggles to spin and this puts extra strain on the motor, which leads to more heat.
Filters
Air filters in your vacuum help keep the air circulating through the machine clean, trapping tiny particles such as dust or allergens. This simple yet crucial task ensures the efficient operation of the vacuum.
A problem arises when these filters get congested. Blocked filters obstruct the easy passage of air and force the motor to exert more effort and, in turn, generate excessive heat. This overheating is a common cause of smoke emanating from a vacuum.
Motor
The motor is the powerhouse of your vacuum, driving the entire system. It's the component that ensures the successful operation of all the other parts.
But when the motor's moving parts lack proper lubrication, they can create unwelcome friction. This friction, over time, leads to a build-up of heat.
Dust Bag or Cylinder
One component that often gets overlooked is the dust bag or cylinder. It's where all the dirt and debris are stored.
A healthy vacuum sees this bag or cylinder regularly emptied, allowing for a smooth operation.
But when it gets overfilled, the bag or cylinder can disrupt the airflow. The reduced airflow then makes the motor work harder, creating additional heat. And with enough heat, you're going to see smoke.

Overstuffed dust bags or clogged filters could also be smoking culprits
Electrical Components
Even the most robust vacuum isn't immune to electrical issues. Its functioning relies heavily on a complex network of wires, connections, and circuits.
Short circuits occur when an unintended path forms between electrical components, allowing an electrical current to travel along an unexpected route. This event can cause excessive heat, leading to smoke or even fire.
Similarly, faulty wiring, such as frayed wires or loose connections, can cause sparks or electrical overloads. These issues also result in overheating and, ultimately, a smoking vacuum.
What You'll Need
Try to gather all these tools and supplies before you inspect and fix your vacuum:
- Screwdriver Set
- Soft Brush
- Needle-nose Pliers
- Flashlight
- Safety Gloves
- Dust Mask
How to Fix Your Vacuum When It's Smoking
Preparation and Safety
Before starting your inspection, you must ensure a safe working environment and be well-prepared. Remember, safety comes first, and a few simple steps can make your DIY task go smoothly.
Switch Off and Unplug
Before anything else, switch off your vacuum cleaner and unplug it from the wall socket. This makes sure there's no electricity flowing through the machine while you're working on it. An unplugged vacuum means zero chance of electric shock.
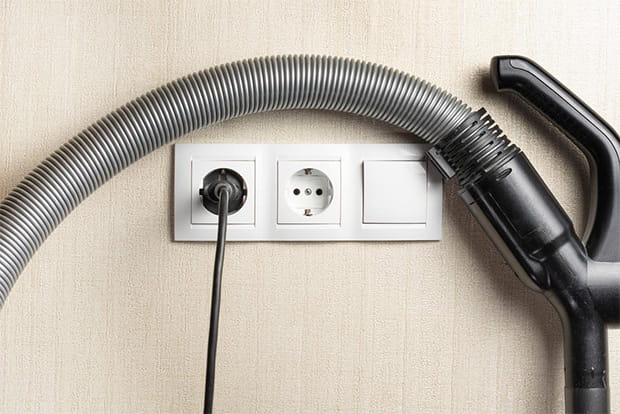
Always power down and unplug your vacuum before inspecting
Find a Suitable Workspace
Pick a spot that's well-lit and spacious enough for you to spread out the vacuum's components as you inspect them. An organized workspace can save you a lot of time and prevent the loss of any small parts.
Wear Appropriate Gear
Handling a vacuum, especially a malfunctioning one, can get messy. It's wise to wear old clothes or a work apron.
For added safety, consider wearing gloves and safety goggles, especially when dealing with the motor or electrical components.
Belt
Most vacuums have a cover plate that protects the belt and the brush roller. Remove this plate to access the belt. You'll typically need a screwdriver to do this.
Once you've exposed the belt, look for signs of wear and tear. Is it stretched out? Are there any cracks or tears? If it's looking worn out or damaged, it's time for a belt replacement.
To remove the old belt, you'll need to dislodge the brush roller first, as the belt loops around it:
- Simply lift the roller out of its place. The belt should come out easily after that.
- Now it's time to place the new belt. Loop it over the motor shaft and then around the brush roller. Make sure it fits snugly and is not twisted.
- Fit the brush roller back into its slot, ensuring that the belt is taut and well-aligned. Once that's done, reattach the cover plate using the screwdriver.
Brush Roller
To check if it's causing your vacuum to smoke, follow these steps:
- Access the brush roller by removing the cover plate with a screwdriver. This will usually be at the bottom of the vacuum.
- Once you've exposed the brush roller, check for any blockages. Look out for debris, hair, or string that might be entangled around it.
- Spin the brush roller manually. If it doesn't rotate freely, there may be something impeding its movement.
- If you've identified the brush roller as the problem, here's how to clean or replace it:
- Remove the brush roller, usually by lifting it straight out of its place.
- Clean the brush roller thoroughly by removing all the debris entangled around it. You can use a pair of scissors to cut any tangled hair or string.
- Once clean, try spinning it again. If it now spins freely, it can be reinserted into the vacuum.
- If the brush roller still doesn't spin freely even after cleaning, it may need to be replaced. Purchase a new brush roller compatible with your vacuum model and insert it where you removed the old one.
- Reattach the cover plate with your screwdriver
Filters

Replacing the filter could be a necessary step
To check if the air filters are the reason behind the smoke and fix them:
- Unscrew or unclip the casing that houses the filters. The location will vary depending on your vacuum model.
- Give the filters a thorough examination. If they're caked with dust and debris, that's what is likely affecting the airflow.
- To clean, gently tap the filters over a bin to dislodge the loose dirt. For a more thorough cleaning, use a soft brush.
- If the filters are washable (check your vacuum's manual to be sure), rinse them under cold water and let them air dry completely before putting them back in.
- Put everything back together. Make sure all parts fit snugly and the casing is screwed or clipped back properly.
Motor
Investigating a vacuum's motor is a bit more complex and might require professional help. But if you're comfortable with DIY tasks, here's how you can check for motor issues:
- Locate the motor housing. This is typically on the underside of the vacuum. Remove the screws holding it in place.
- Carefully remove the housing to expose the motor. Do not touch anything yet.
- Look for signs of excessive dust or debris. Also, check for any visible damage or burn marks on the motor.
- Smell the motor. A burnt smell can indicate overheating due to friction.
- If you notice any of these signs, it's best to consult a professional for repair or replacement. The motor is a complex component, and mishandling it can lead to further issues.
- Replace the motor housing and secure it with the screws you removed earlier.
- When it comes to the motor, remember that safety is paramount. If you're not confident handling it yourself, don't hesitate to seek professional help.
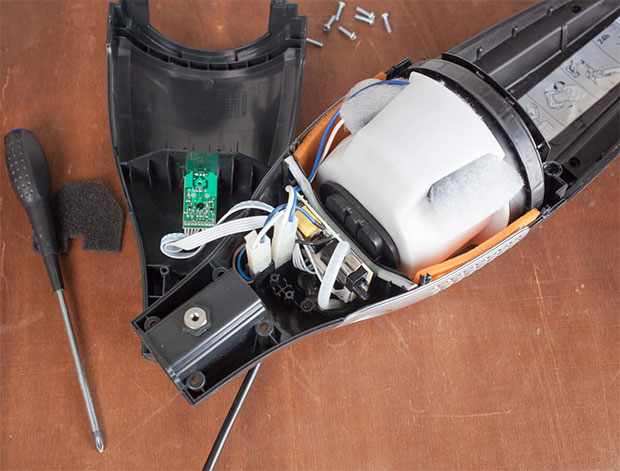
Treat the motor with the utmost care
Dust Bag or Cylinder
A quick check can reveal if the dust bag or cylinder is the cause of your smoking problem:
- Remove the dust bag or empty the cylinder. Most vacuums have a simple clip or latch system for this.
- Inspect the bag or cylinder for any tears or damage. A damaged bag or cylinder may not hold dirt properly and can obstruct the airflow.
- Replace the dust bag or clean the cylinder. If it's a bag, make sure you get a replacement that's suitable for your vacuum model.
- Reinstall the bag or cylinder. Ensure it's securely attached to avoid any leaks or airflow issues.
Electrical Components
Examining electrical issues like short circuits or faulty wiring requires technical knowledge and expertise. Still, you can conduct a basic check:
- Look for any visible signs of damage on the vacuum's power cord. Things like fraying, burns, or exposed wires are immediate red flags.
- Smell the area near the power cord and plug. A burnt smell is a clear sign of an electrical issue.
- Listen to the vacuum while it's running (only do this before it starts smoking). A crackling or popping sound can indicate an electrical problem.
- However, remember that messing with electrical components can be risky if you don't know what you're doing.
- If you suspect an electrical problem, it's highly recommended to reach out to a professional repair service. The risk of electrical shock or further damage to your vacuum is not worth taking a DIY approach here.
When You May Need Professional Help

Leave the electronic components to the skilled hands of professionals
While a bit of DIY can solve many common vacuum issues, there are times when you'll need a professional's expertise.
Complex issues like motor faults or electrical problems are best left to the professionals. You don't want to risk damaging a critical component or worse, getting an electric shock.
Your vacuum's warranty also plays a part here. If your machine is under warranty, it's always a good idea to contact the manufacturer or supplier. Performing DIY repairs might void the warranty, while the manufacturer can often fix or replace your vacuum for free.
A rule of thumb is if you're not 100% sure about what's causing the smoke or how to fix it, it's safer to call in the professionals. It might cost you a bit more, but you'll get peace of mind knowing that your vacuum has been repaired properly and is safe to use.
Also, remember the value of your time. A professional can often identify and fix the issue quickly.
If you're spending hours on a repair and getting nowhere, it might be more cost-effective to seek professional help. The time you save can be worth more than the cost of the repair.
Tips on Preventing Your Vacuum From Smoking
Regularly Empty the Dust Bag or Cylinder
It sounds simple, but it's surprising how often this is overlooked. If your vacuum's dust bag or cylinder is too full, it can obstruct the airflow, causing the motor to work harder and potentially overheat.
To avoid this, make it a habit to regularly check your vacuum's dust bag or cylinder. If it's getting full, empty it before your next vacuuming session. Not only will this prevent overheating, but it will also maintain your vacuum's suction power.
Clean the Filters Regularly
Just like the dust bag or cylinder, your vacuum's filters also need regular cleaning. Clogged filters can restrict the airflow and cause the vacuum to overheat, leading to a smoking situation.
Try to clean your filters every couple of months or more frequently if you use your vacuum often.
If your filters are washable, a rinse under cold water should do the trick. If they're not, give them a gentle shake over a bin to remove the dust.
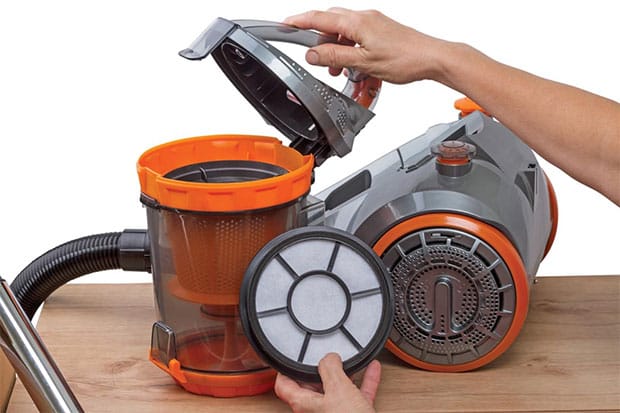
Regular filter cleaning is a simple preventive measure
Careful with the Power Cord
Power cords can be a source of electrical issues if not handled properly. Pulling on the cord to unplug the vacuum, for instance, can cause the wires inside to fray over time, leading to a potential short circuit.
Always unplug the vacuum by pulling on the plug, not the cord. Also, be mindful of where the cord is while vacuuming.
Avoid running over it as it can cause damage. Regularly inspect your power cord for any signs of wear and tear. If you notice any, it's time to get it replaced.
Perform Regular Checks
Taking a few minutes to inspect your vacuum before you use it can save you from bigger issues down the line.
Look out for any visible damage or unusual noises when it's running. Also, check the brush roller for any tangled hair or debris and the air filters for blockage.
If the vacuum isn't picking up dirt as efficiently as it used to, it might be a sign that a component is wearing out and may need replacement. Regular checks can help you spot potential problems early and address them before they lead to more serious issues like smoking.
Replace Components as Needed
Vacuum components don't last forever. The belt and brush roller, for instance, experience wear and tear over time and may need to be replaced. If you've cleaned your brush roller and it still doesn't spin freely, it might be time for a new one.
Similarly, a stretched or worn-out belt won't drive the brush roller efficiently. If you notice your vacuum isn't picking up dirt like it used to, check the belt.
A simple replacement can often restore your vacuum to its former glory. Remember, preventative maintenance is always better than waiting for a complete breakdown.
Avoid Overworking Your Vacuum

Avoid letting your vacuum run excessively to prevent wear and tear
While it's tempting to power through your whole house in one vacuuming session, giving your machine a break can help prevent overheating. Your vacuum's motor generates heat as it works, and running it for extended periods can cause it to overheat.
Knowing how to make a vacuum cleaner work properly means trying to break up your vacuuming sessions into manageable chunks and giving it a chance to cool down in between.
If you notice your vacuum getting unusually hot or emitting a burning smell, stop using it immediately and give it a chance to cool down. This can prevent more serious issues like smoking and prolong the life of your vacuum.
Conclusion
Understanding the causes behind a smoking vacuum and knowing how to address them can be a game-changer. By reading this guide, you've taken a big step towards answering "Why is my vacuum smoking?" and prolonging the life of your vacuum.
Remember, if things get tough, don't shy away from professional help. After all, the ultimate goal is to keep your vacuum in top shape and your home clean and tidy.
FREQUENTLY ASKED QUESTIONS
- 01. Can I Vacuum Without a Dust Bag or Filter??
-
While technically you can, it's not recommended. The dust bag and filters play a crucial role in trapping dirt and maintaining clean airflow. Vacuuming without them could lead to serious motor damage.
- 02. I Smell a Burning Smell When Using My Vacuum. Should I Be Worried??
-
A burning smell could be a sign of a worn-out belt, motor overheating, or even an electrical problem. It's a clear signal that you should stop using your vacuum and investigate. If you can't find the cause, consult a professional.
- 03. My Vacuum Is Making a Weird Noise. What Should I Do??
-
Unusual noises can be a sign of a problem. It could be something simple like debris caught in the brush roller or a more complex issue like a motor fault. Start by checking the brush roller and belt. If the noise persists, it might be time to consult a professional.
- 04. How to Clean a Vacuum Hose??
-
Start by detaching the hose from the vacuum, if possible. Straighten it out and look through it to check for any obvious blockages. If you spot any, use a long flexible brush or a straightened coat hanger to gently push it out.
For a thorough clean, fill your sink or tub with warm water and some mild dish soap. Submerge the hose, let it soak for a bit, then rinse thoroughly.
- 05. How Often Should I Replace My Vacuum's Belt??
-
The belt's lifespan depends on how much you use your vacuum. As a general rule, you should consider replacing it every 6 to 12 months. But if you notice decreased performance or a burning smell, it might be time for a replacement sooner.


